
1. What HAM Digi is
HAM Digi (by SA7SVR · HELLAS Zone Net) is a program for amateur-radio digital modes: FT8, FT4, JT65, JT9, JT4, Q65, MSK144, FST4, FST4W, WSPR, CW, RTTY, PSK31, Echo and FreqCal. It works like WSJT-X — the same messages, the same UDP protocol, but with our own decoder — and adds: a profile for every radio, Auto CQ, a map with flags, a QSO Log, sending to every well-known logbook, and a link to the HELLAS Zone Logger.
- Windows 10/11, macOS (Apple Silicon and Intel), Linux (Ubuntu / Debian / Mint).
- Ελληνικά, English, Svenska — change it in Settings › General › Language.
- Every button explains itself: rest the mouse on it for a moment.
- New versions arrive by themselves inside the program.
2. Installation
Download the program from hellaszone.com/hamdigi. Full name, callsign and e-mail are needed — one download per callsign.
Windows
- Open
HAMDigi-…-Windows-Setup.exe. - If “Windows protected your PC” appears: More info › Run anyway.
- Choose the language and Install.
Mac
- Download the right file: Apple Silicon (M1/M2/M3/M4) or Intel.
- Open the .zip and drag
HAM Digi.appto Applications. - The first time: right-click › Open › Open (or System Settings › Privacy & Security › “Open Anyway”).
- Allow the Microphone — that is what macOS calls the radio’s sound card.
Linux
- Ubuntu 22.04+ / Debian 12+ / Mint 21+:
sudo apt install ./HAMDigi-…-linux-x64.deb - Other distributions: unpack the .tar.gz and run
./hamdigi(libgfortran5andlibfftw3-single3are needed). - For the radio serial port:
sudo usermod -aG dialout $USER, then log out and in.
3. First start: registration and licence
- At the first start the program asks for your full name, callsign and e-mail. They are entered once — afterwards only the e-mail can be changed.
- If they match your download from the website, the registration is approved at once. Otherwise it waits for the administrator (SA7SVR) and the program opens by itself as soon as it is approved.
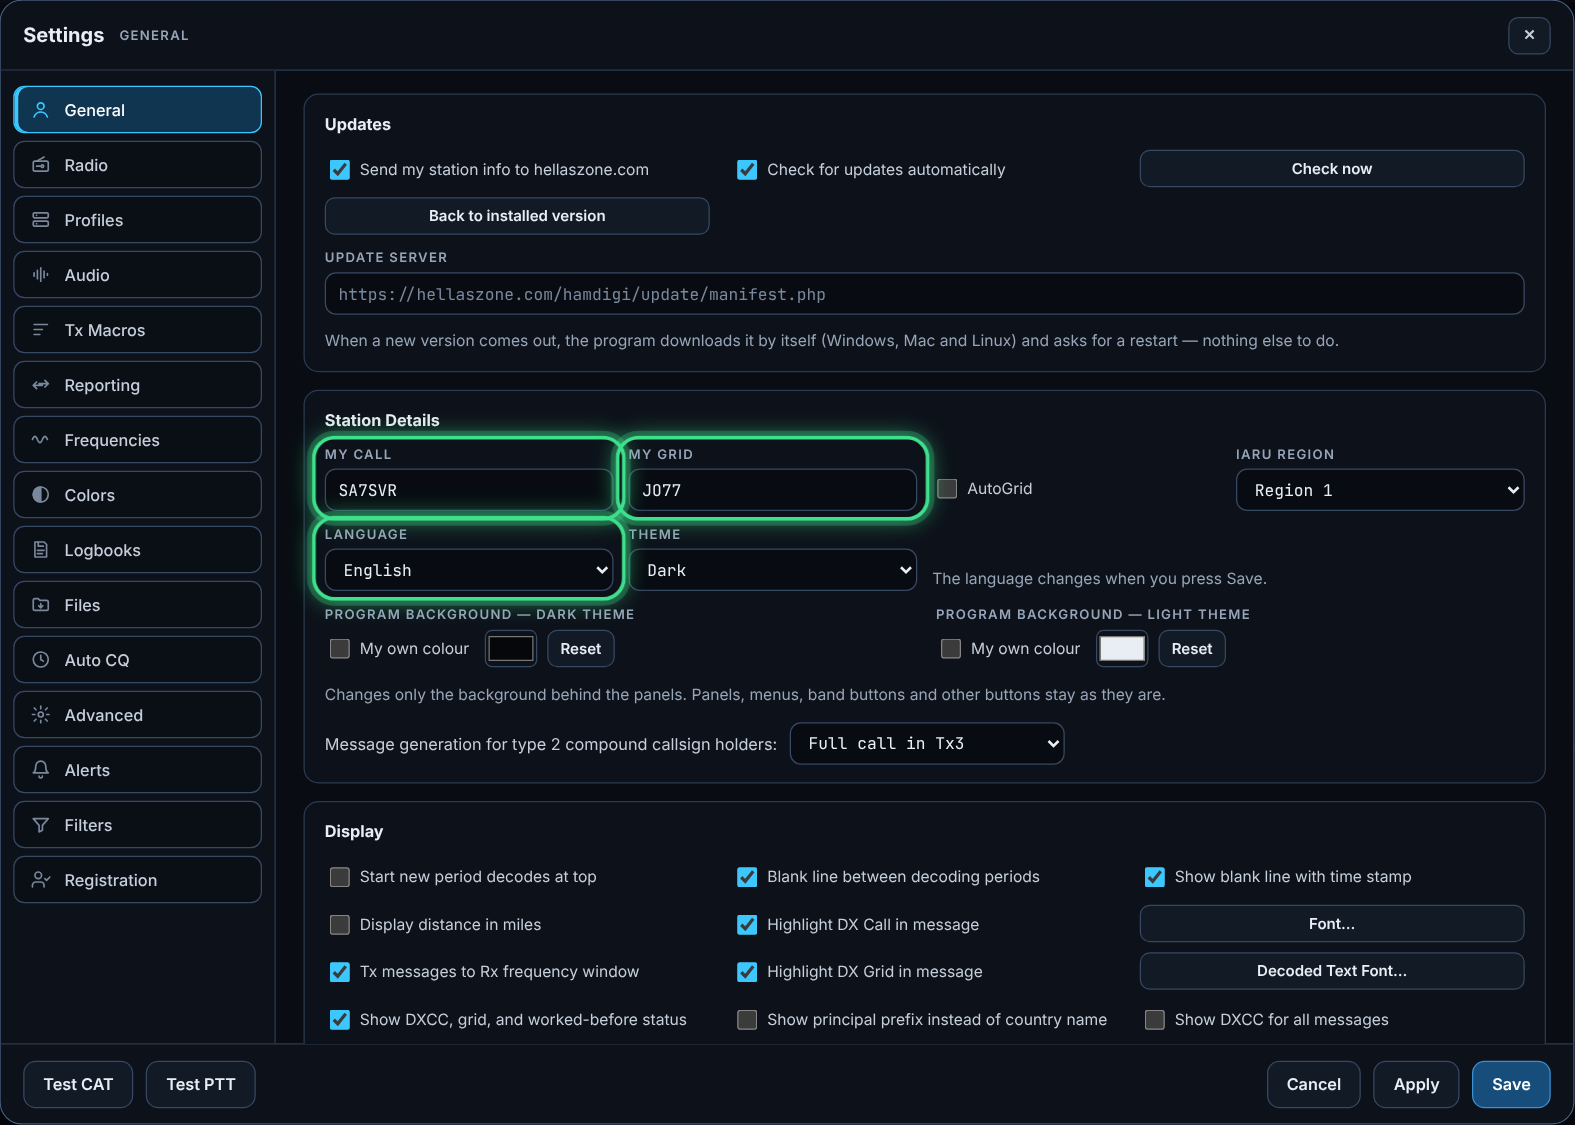
- Enter My Call and My Grid (e.g. JO77) in Settings › General. My Call may differ from the registered callsign (e.g. /P or a club).
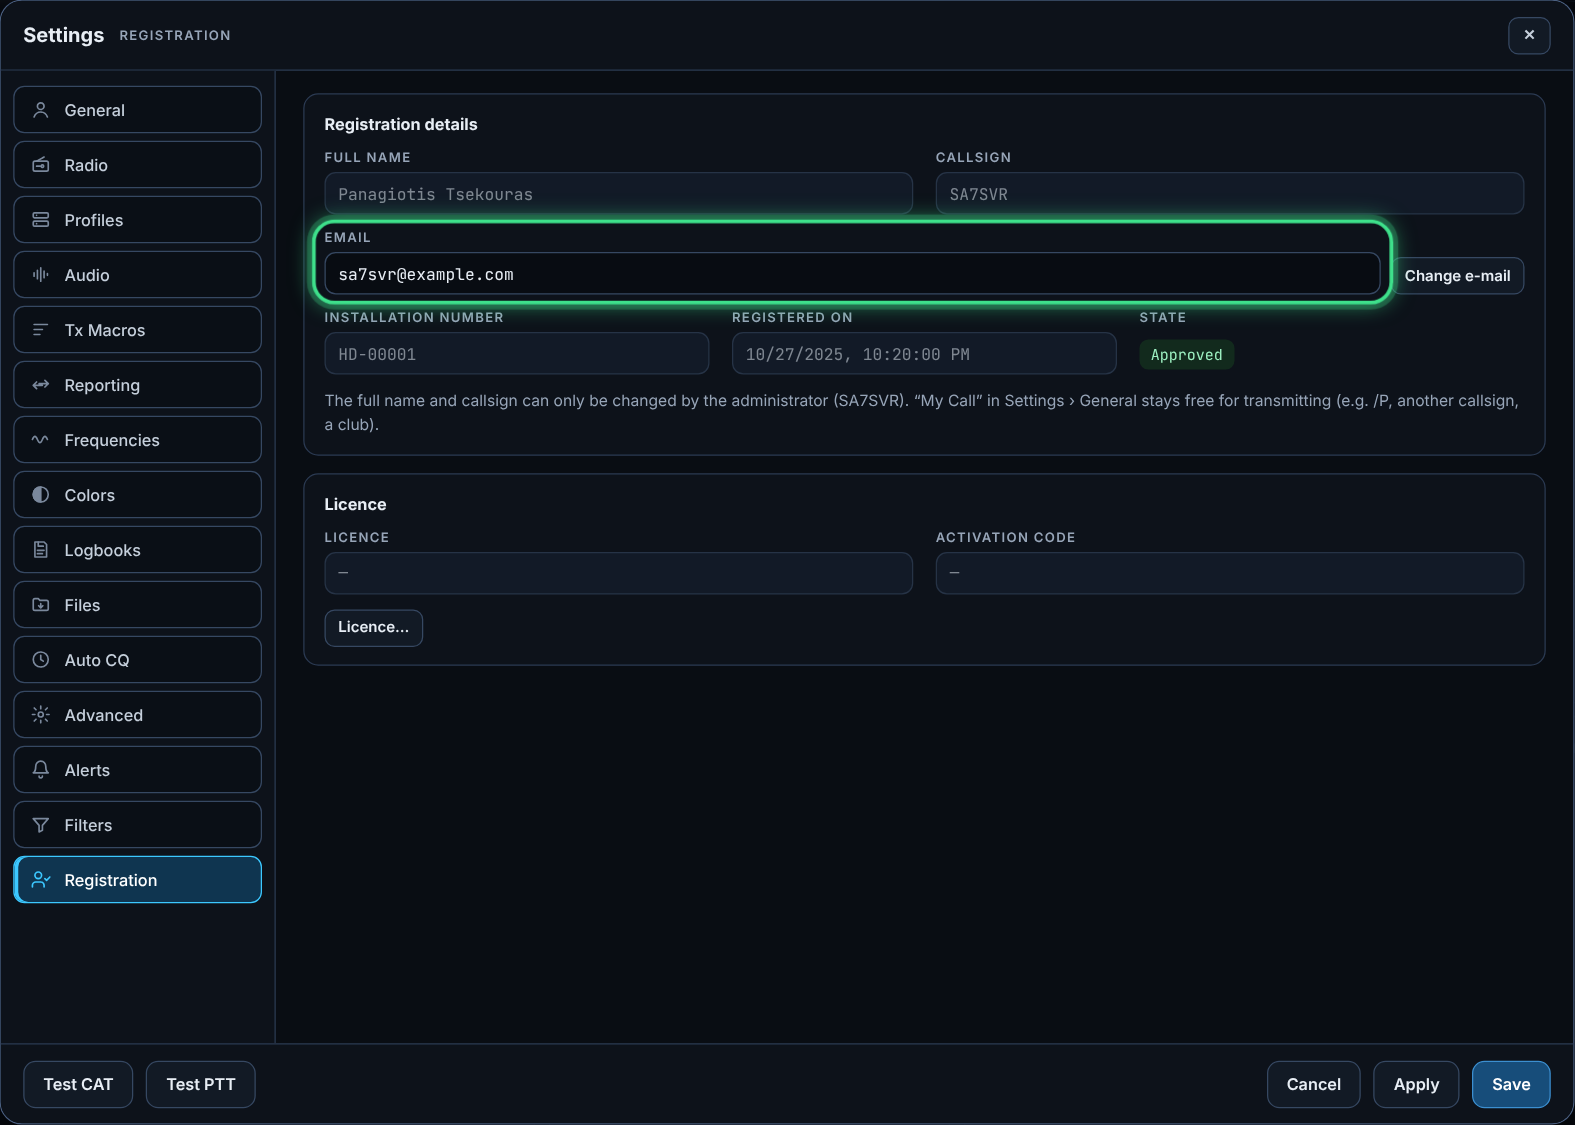
Your details are in Settings › Registration: name and callsign (locked), e-mail, installation number HD-… and state.
Licence
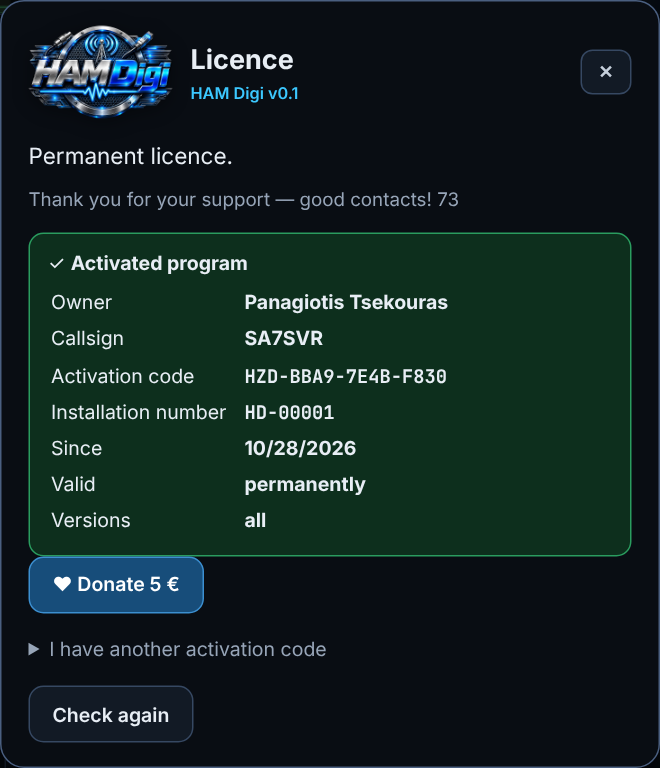
Help › Licence shows the state: free, demo, permanent licence. To activate the program with a donation, press the Donate button inside the program: your HD-… number travels with the payment and activation happens automatically within a few minutes. Activation codes are only for special cases (“I have another activation code”).
4. Radio profiles and the start window
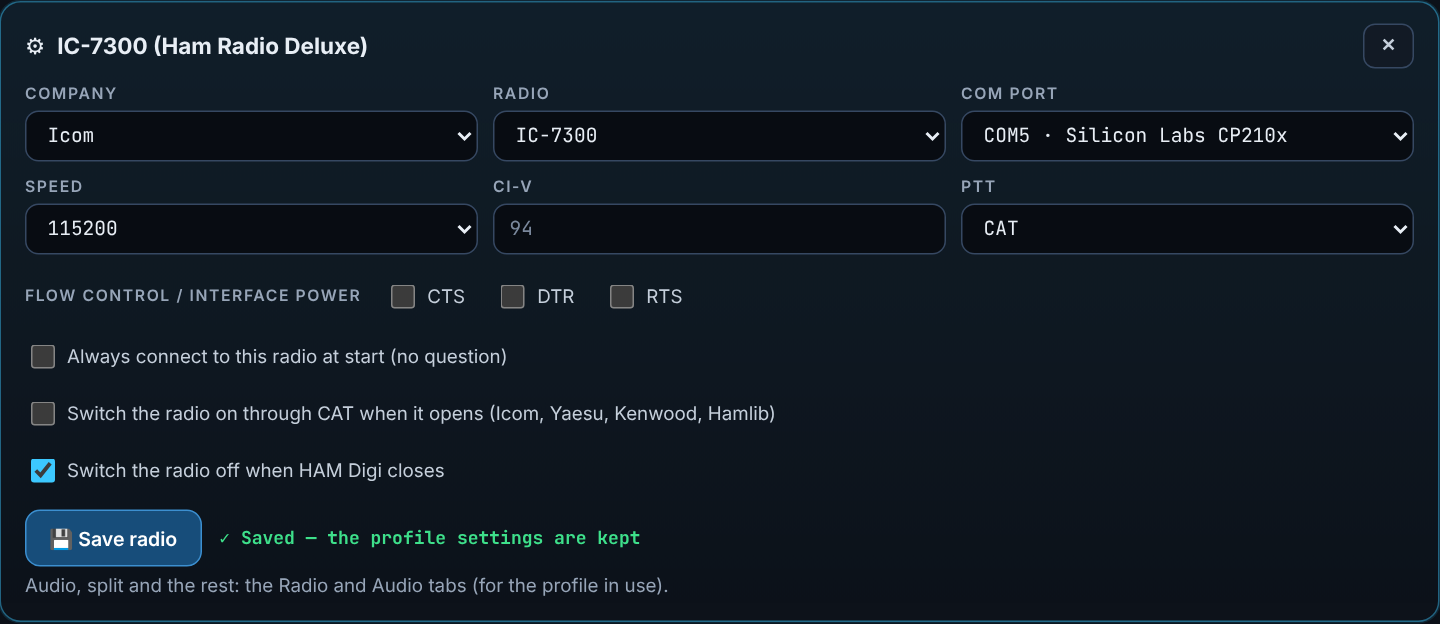
Each profile is one radio with its connection, sound cards, power per band and calibration. Log, logbooks, colours and macros are shared.
- Settings › Profiles › New profile — it starts as a copy of the current one.
- Press ⚙ Radio setup: make, radio, COM port, speed, CI-V, PTT, CTS / DTR / RTS.
- Profile options:
- Always connect to this radio at start — opens directly, no question.
- Switch the radio on through CAT when it opens (Icom, Yaesu, Kenwood, Hamlib).
- Switch the radio off when HAM Digi closes.
- Press 💾 Save radio — “✓ Saved” appears.
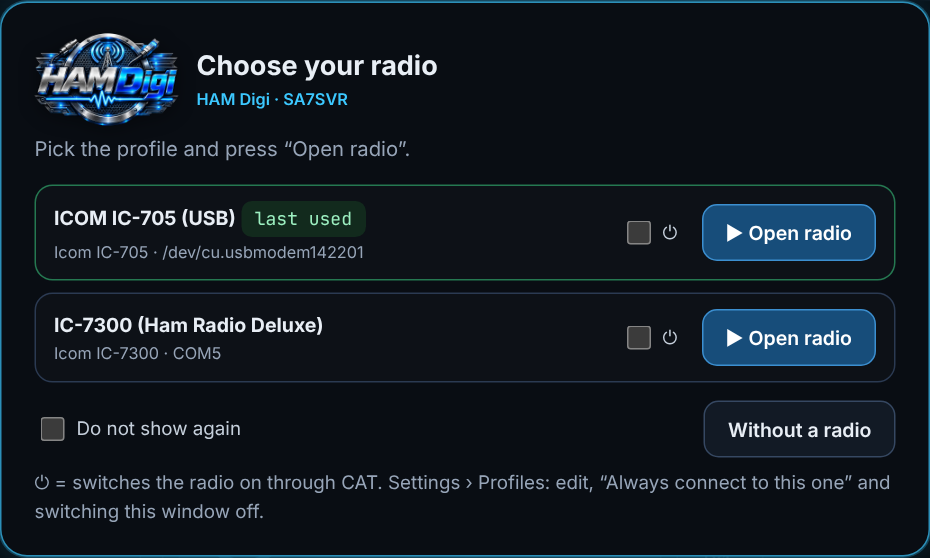
With two or more profiles, the Choose your radio window opens at start: pick one and press ▶ Open radio. ⏻ switches the radio on through CAT. Quick switch: click “Profile: …” at the bottom or Ctrl+Shift+1…9.
5. Connecting the radio (CAT)
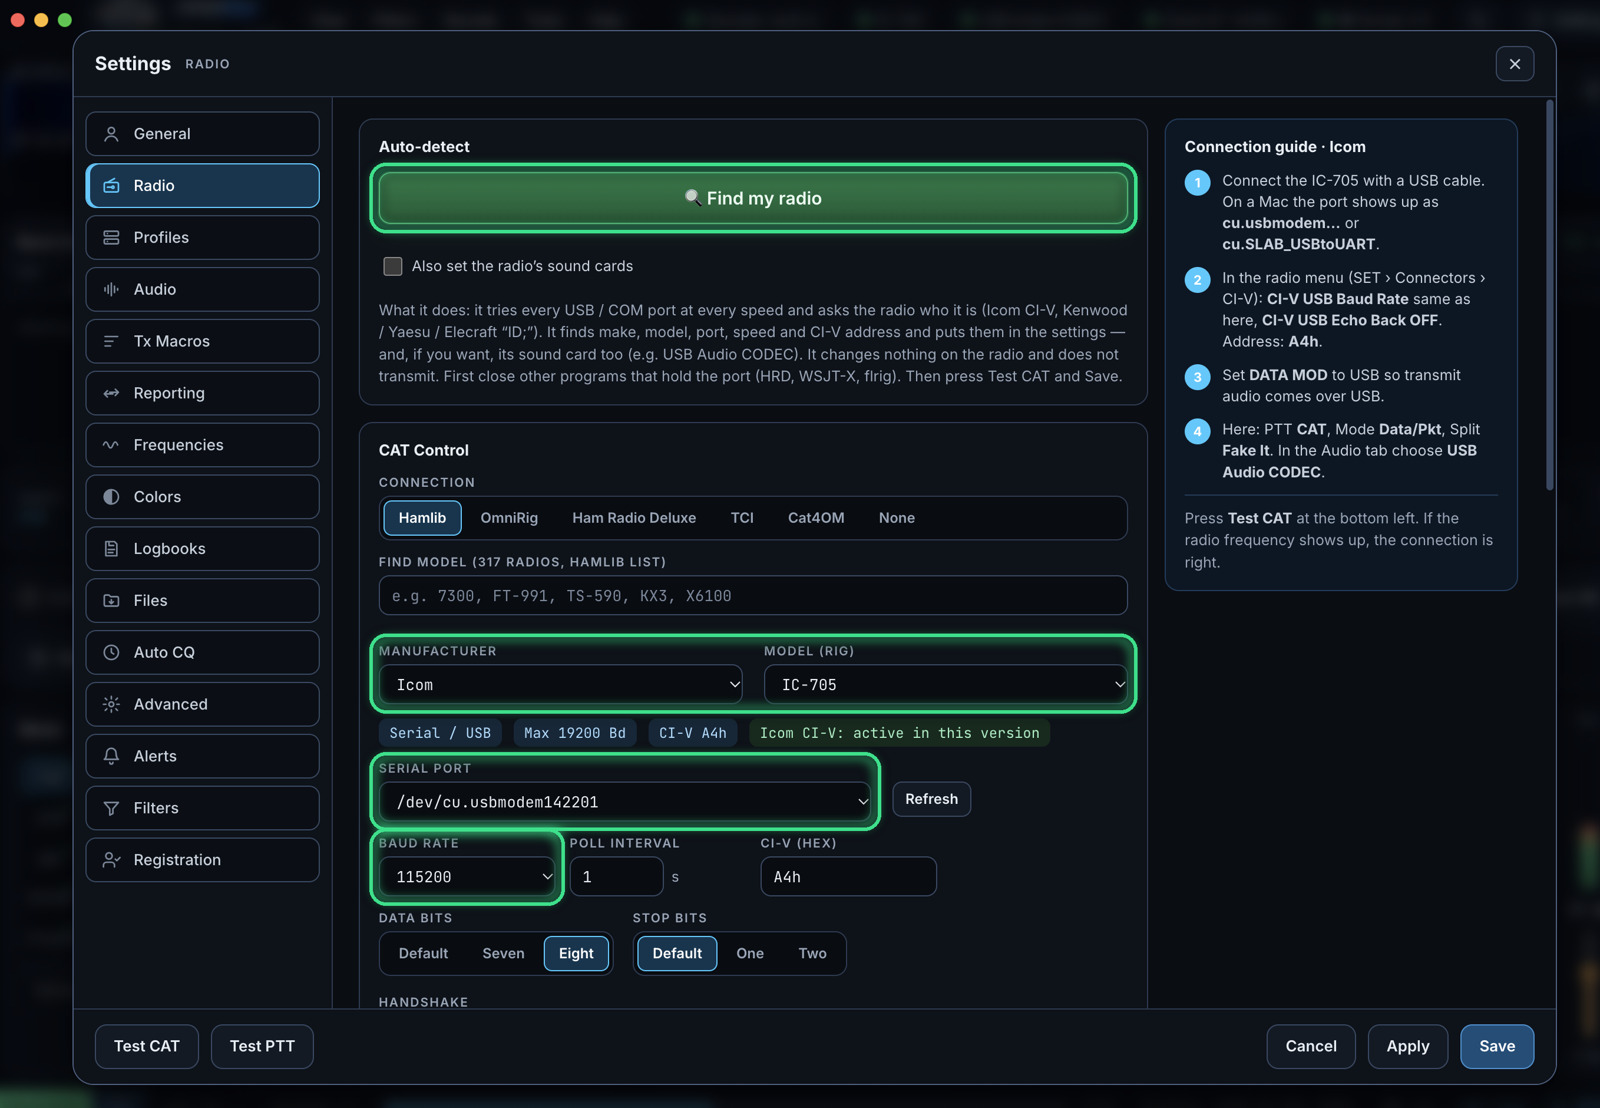
Auto-detect — “Find my radio”
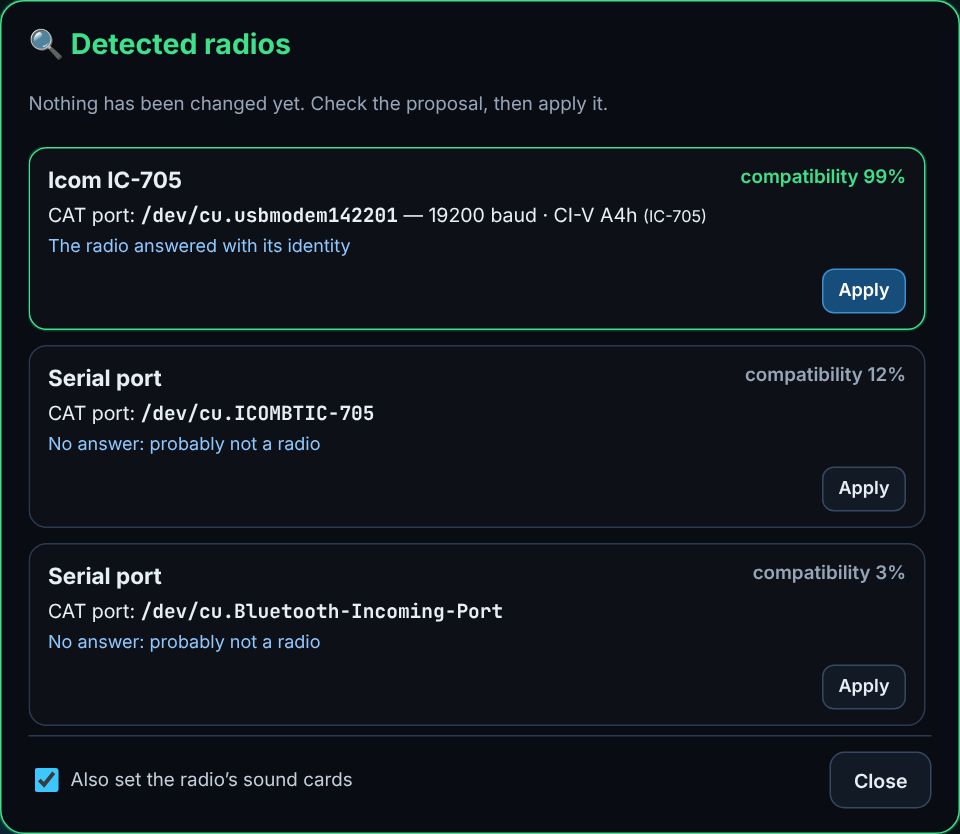
At the top of Settings › Radio. It tries every USB/COM port at every speed and asks the radio who it is. It finds make, model, port, speed and CI-V and, if you want, its sound cards. The results are shown with a compatibility %; nothing changes before you press Apply. First close other programs that hold the port (HRD, WSJT-X, flrig, HZ Logger).
Connection types
| Connection | When |
|---|---|
| Hamlib | Directly on the radio’s port — every model (Icom, Yaesu, Kenwood, Elecraft, Xiegu, FlexRadio…). |
| Ham Radio Deluxe | When you use HRD Rig Control (port 7809). HAM Digi switches DATA (USB-D) on by itself. |
| OmniRig | Windows only; the setup is done inside OmniRig. |
| TCI | SDR (ExpertSDR, Thetis). With “TCI audio” no sound card is needed. |
| Cat4OM | The radio control of Log4OM. In CAT4OM enable Hamlib Rigctl Emulation in the radio’s group and type its port in HAM Digi. |
| None | No radio: you type the frequency by hand. |
Important settings
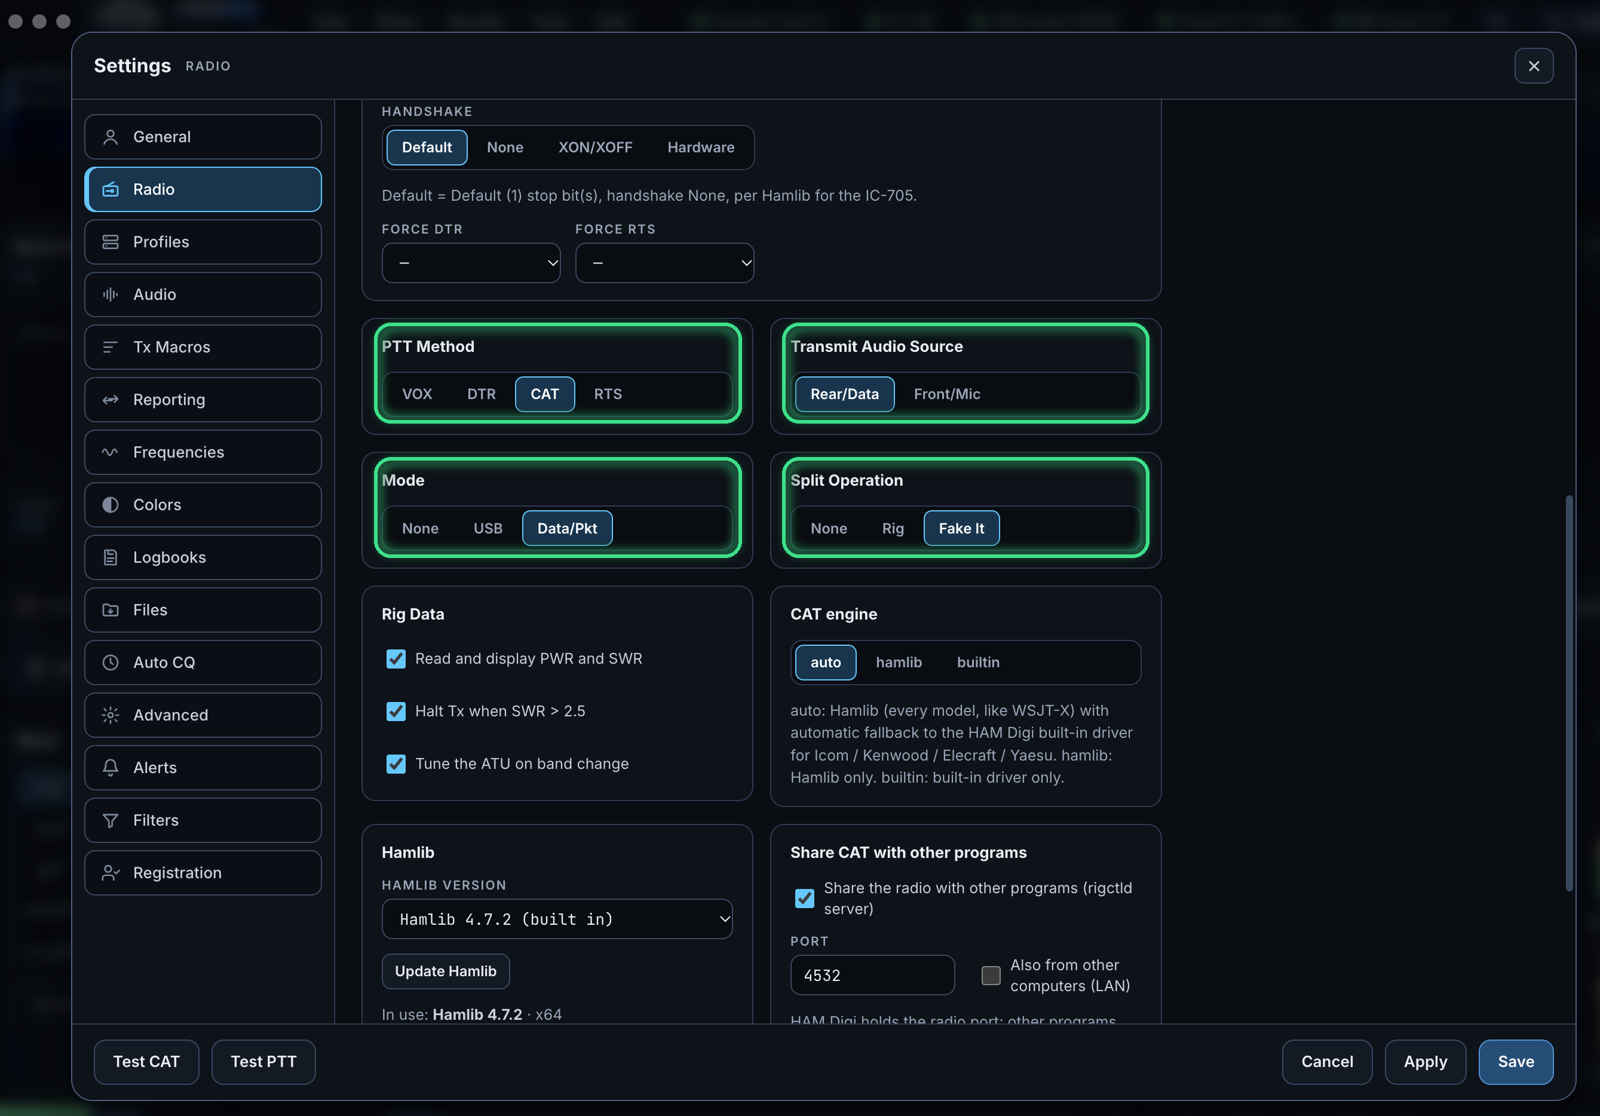
- Mode: Data/Pkt — the radio goes to USB-D / DATA-U. With plain “USB” many models (IC-705, IC-7300) transmit from the microphone.
- PTT: CAT (recommended). With an external interface: RTS or DTR.
- Press Test CAT (the frequency must appear) and Test PTT (transmits for 5 seconds).
- CAT log: shows what was sent and what the radio answered — send it to SA7SVR when something does not work.
Settings on the radio itself
| Radio | Menu |
|---|---|
| Icom (IC-7300, IC-705, IC-7610, IC-9700…) | SET › Connectors › CI-V: CI-V USB Baud Rate the same as in HAM Digi, CI-V USB Echo Back OFF. DATA MOD = USB. Audio: “USB Audio CODEC”. |
| Yaesu (FT-991A, FT-891, FT-710, FTDX10, FTDX101…) | CAT RATE the same, CAT TOT 100 ms+, CAT RTS ENABLE (or Handshake None here). DATA MOD SOURCE = REAR/USB, DATA PTT SELECT = DAKY or RTS. Older models (FT-817/857/897, FT-1000…) use Hamlib automatically. |
| Kenwood / Elecraft | The same COM/USB speed, DATA audio input from USB. |
External interface (U5 Link, Digirig, SignaLink)
Port = the interface’s port, PTT = RTS (or DTR), Handshake None. Audio: the interface’s or the computer’s sound card. On the radio: DATA PTT SELECT = DAKY (or RTS). HAM Digi switches flow control off by itself when RTS is used for PTT.
6. Audio
- Settings › Audio: Input and Output = the radio’s sound card (e.g. “USB Audio CODEC”).
- Receive level (DB on the right): ideally 30–60 dB.
- The PWR slider on the right: the transmit audio level. It changes at once, also while transmitting. Set it so that the radio shows no ALC.
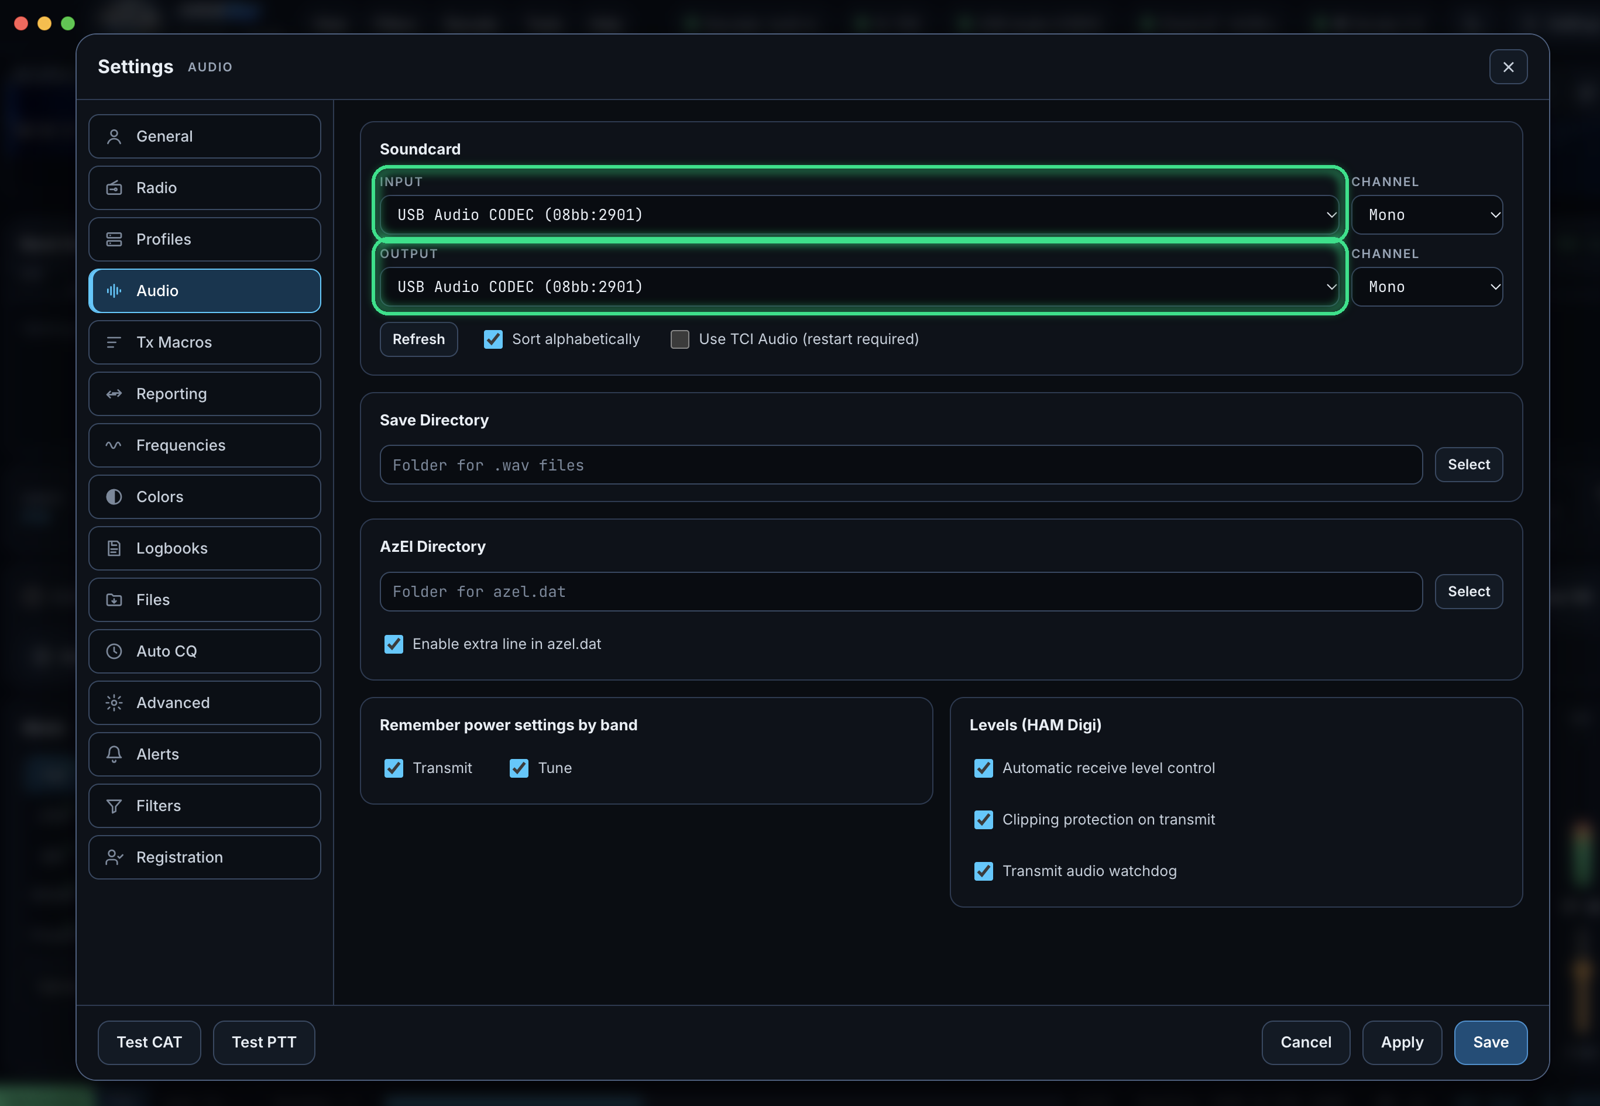
Safety: if the chosen output card is missing or the system refuses it, HAM Digi does not transmit and tells you — so the microphone is never sent and the tone never plays on the speakers. PTT is always released at the end of the period.
7. The main window
Waterfall and map (top)
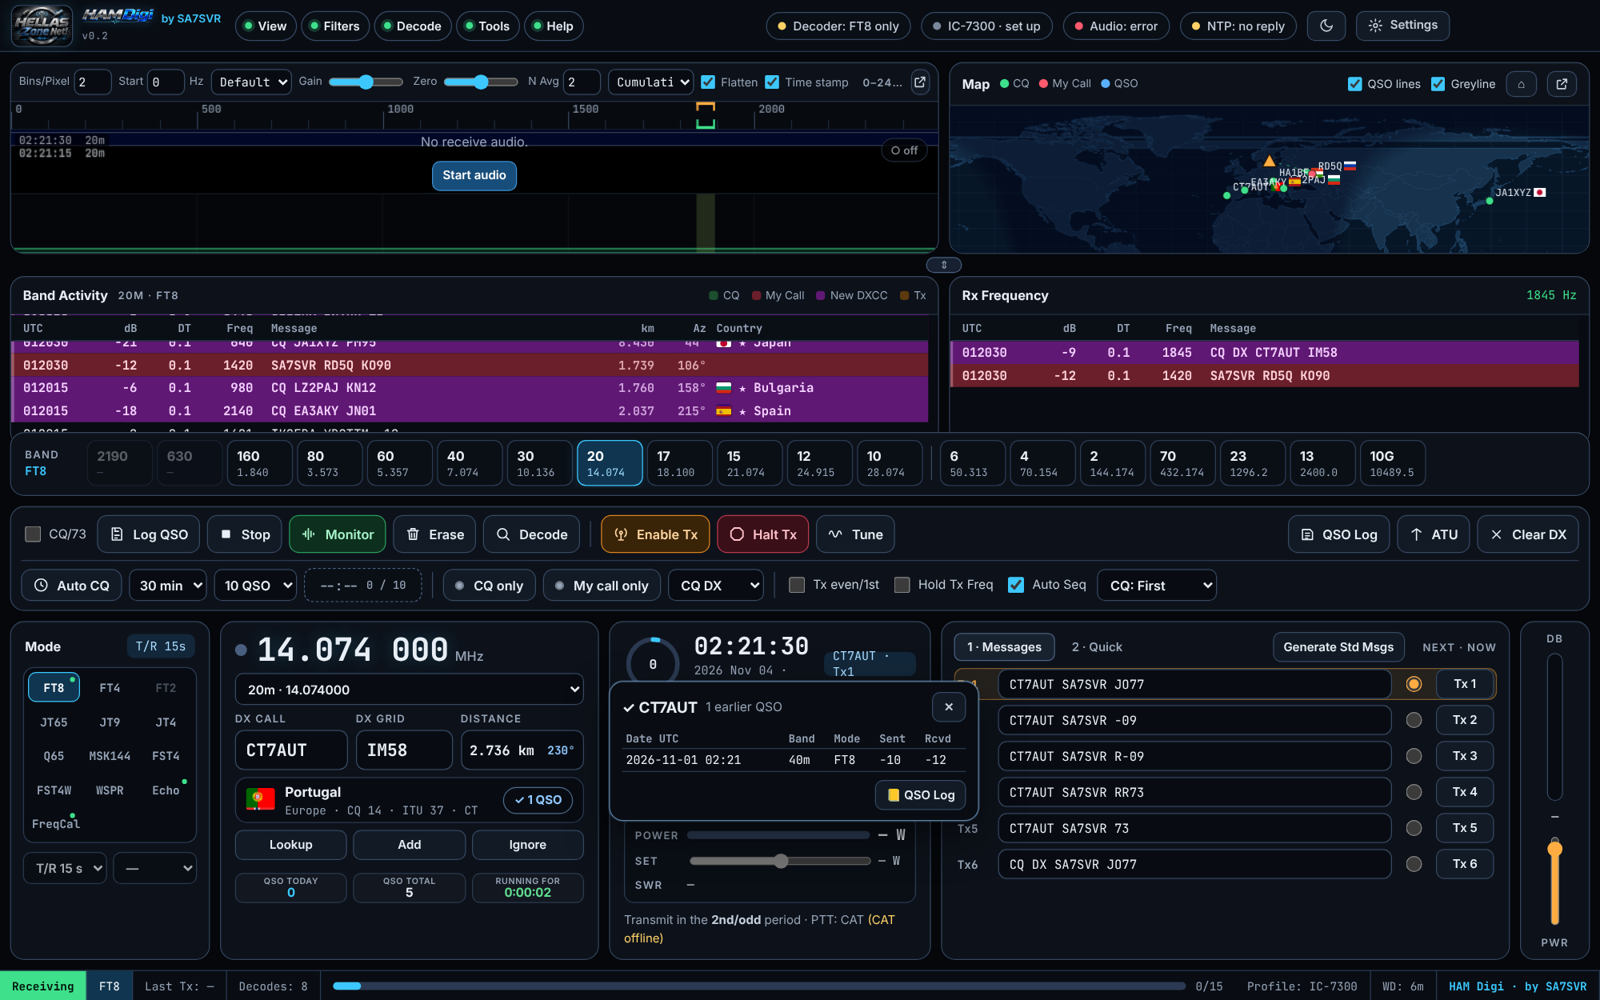
- Click the waterfall: receive frequency (Rx). Shift+click: transmit (Tx). Ctrl/⌘+click: both.
- The map shows the stations with flags. Double-click a station: it is picked for a QSO. Over the triangle: your own details. While you transmit, a thin dashed line with an arrow moves towards the station.
- The ⇕ grip between the waterfall and the lists changes their height. The lower part (bands, buttons, messages) always stays in place.
- Zoom the whole window: Ctrl/⌘ + + / − / 0. Size, position and zoom are remembered.
Band Activity and Rx Frequency
Every decode: UTC, dB, DT, Freq, message, km, azimuth and country with its flag. Colours: green CQ, red your call, purple new DXCC. ★ = new country, L = LoTW user. Double-click a message = call the station.
Bands and buttons
- Click a band: the radio goes to the frequency of the mode and to DATA.
- Top row: CQ/73, Log QSO, Stop, Monitor, Erase, Decode, Enable Tx, Halt Tx (Esc), Tune, QSO Log, ATU, Clear DX.
- Second row: Auto CQ (time, QSO limit, countdown), CQ only, My call only, CQ text (CQ, CQ DX, CQ EU, CQ POTA…), Tx even/1st, Hold Tx Freq, Auto Seq, CQ: First.
DX station
DX Call · DX Grid · Distance (km and degrees). Below, the country box: flag, country, continent, CQ / ITU zones, prefix, and on the right “★ First time” or “✓ n QSO”. If you worked the station before, a window opens with a small logbook of the earlier QSOs (⚠ = already on the same band and mode).
Boxes: QSO TODAY, QSO TOTAL (click: QSO Log), RUNNING FOR (running time today).
Messages Tx1–Tx6
The six standard QSO messages. The dot shows the next one; the Tx n button sends it now. Tx6 is your CQ, with the CQ text you chose. “2 · Quick”: free text and macros.
8. An FT8 QSO step by step
- Choose FT8 and a band. Make sure the clock ΔT is below 1 s (green indicator at the top).
- To answer a CQ: double-click the station’s CQ message. DX Call, Grid and the messages fill in and transmit is enabled.
- To call CQ: pick Tx6 and press Enable Tx. With “CQ: First” you answer the first station that calls you automatically.
- With Auto Seq the program moves on by itself: report → R+report → RR73 → 73.
- At the end Log QSO opens (or it is logged automatically, if you chose that). The QSO is written to the log and sent to every logbook.
Stop transmitting with Halt Tx or Esc.
9. Auto CQ
Auto CQ calls CQ, answers the stations that call you, completes and logs the QSOs by itself, until the time or QSO limit. The countdown shows the time and “QSOs / limit”.
- Choose the time (15 min – …) and the QSO limit next to the button.
- Press Auto CQ and accept the responsibility (in many countries unattended transmission is restricted).
- If it stops (e.g. sound card, a Halt command from another program), it writes the reason.
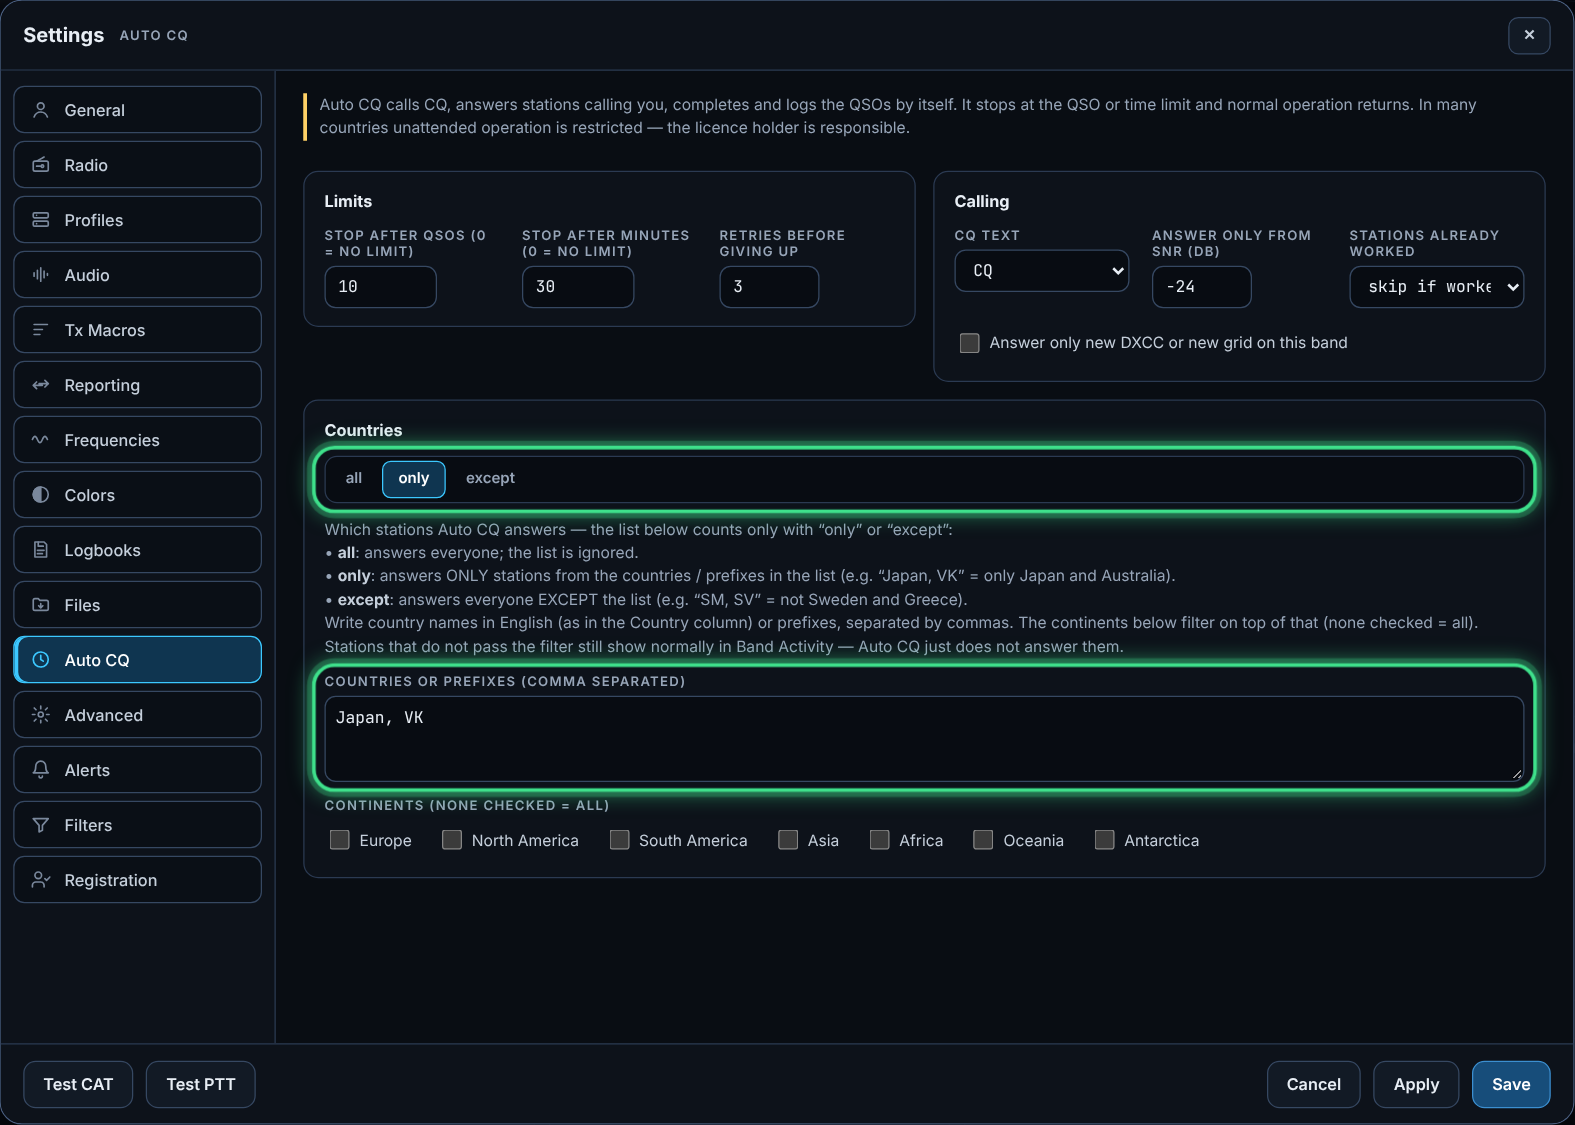
Settings › Auto CQ › Countries
- all: answers everyone; the list is ignored.
- only: answers ONLY the countries / prefixes in the list (e.g. “Japan, VK”).
- except: answers everyone EXCEPT the list (e.g. “SM, SV”).
Write country names in English or prefixes, separated by commas. The continents filter on top of that. There are also a minimum SNR, “skip stations already worked”, the number of tries and “only new countries / grids”.
10. QSO Log and logbooks
QSO Log
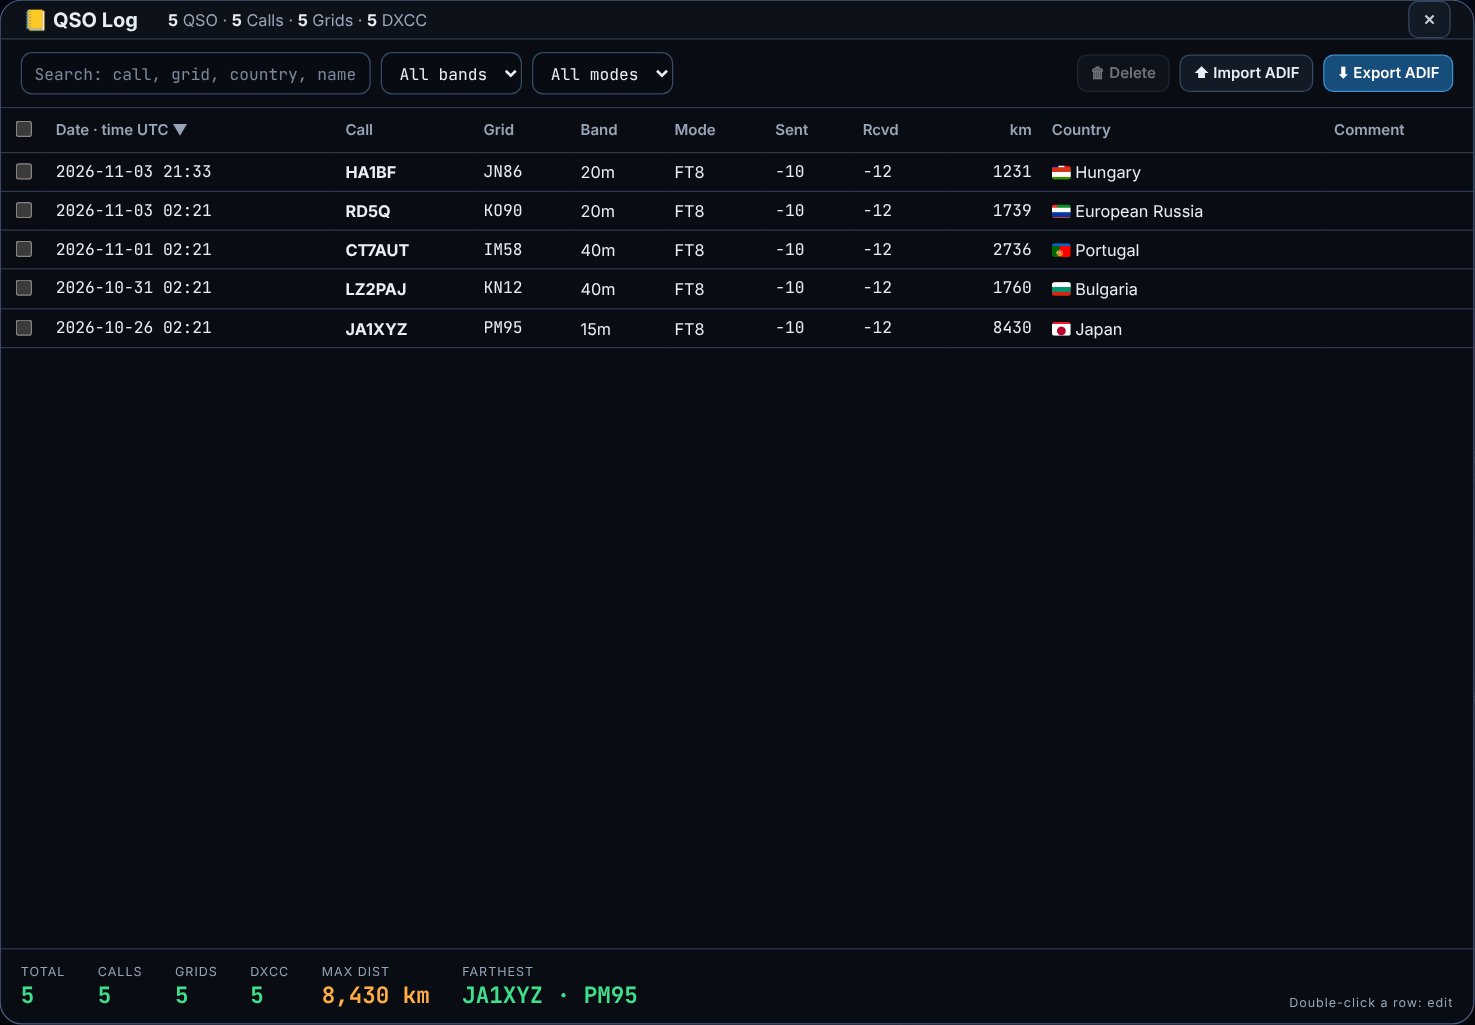
View › QSO Log, the QSO Log button, or a click on QSO TOTAL. Search, band / mode filters, sorting, double-click to edit, delete selected, Import ADIF (your old QSOs — for “worked before”) and Export ADIF. At the bottom: totals of QSOs, calls, grids, DXCC, maximum distance.
Sending to logbooks
Settings › Logbooks: every QSO goes automatically to the ones you enable:
- HRD Logbook / N1MM / Log4OM (ADIF UDP 2333), N3FJP, DXKeeper, an ADIF file.
- Online: QRZ Logbook, LoTW (through TQSL), Club Log, eQSL, HRDLog, Cloudlog / Wavelog.
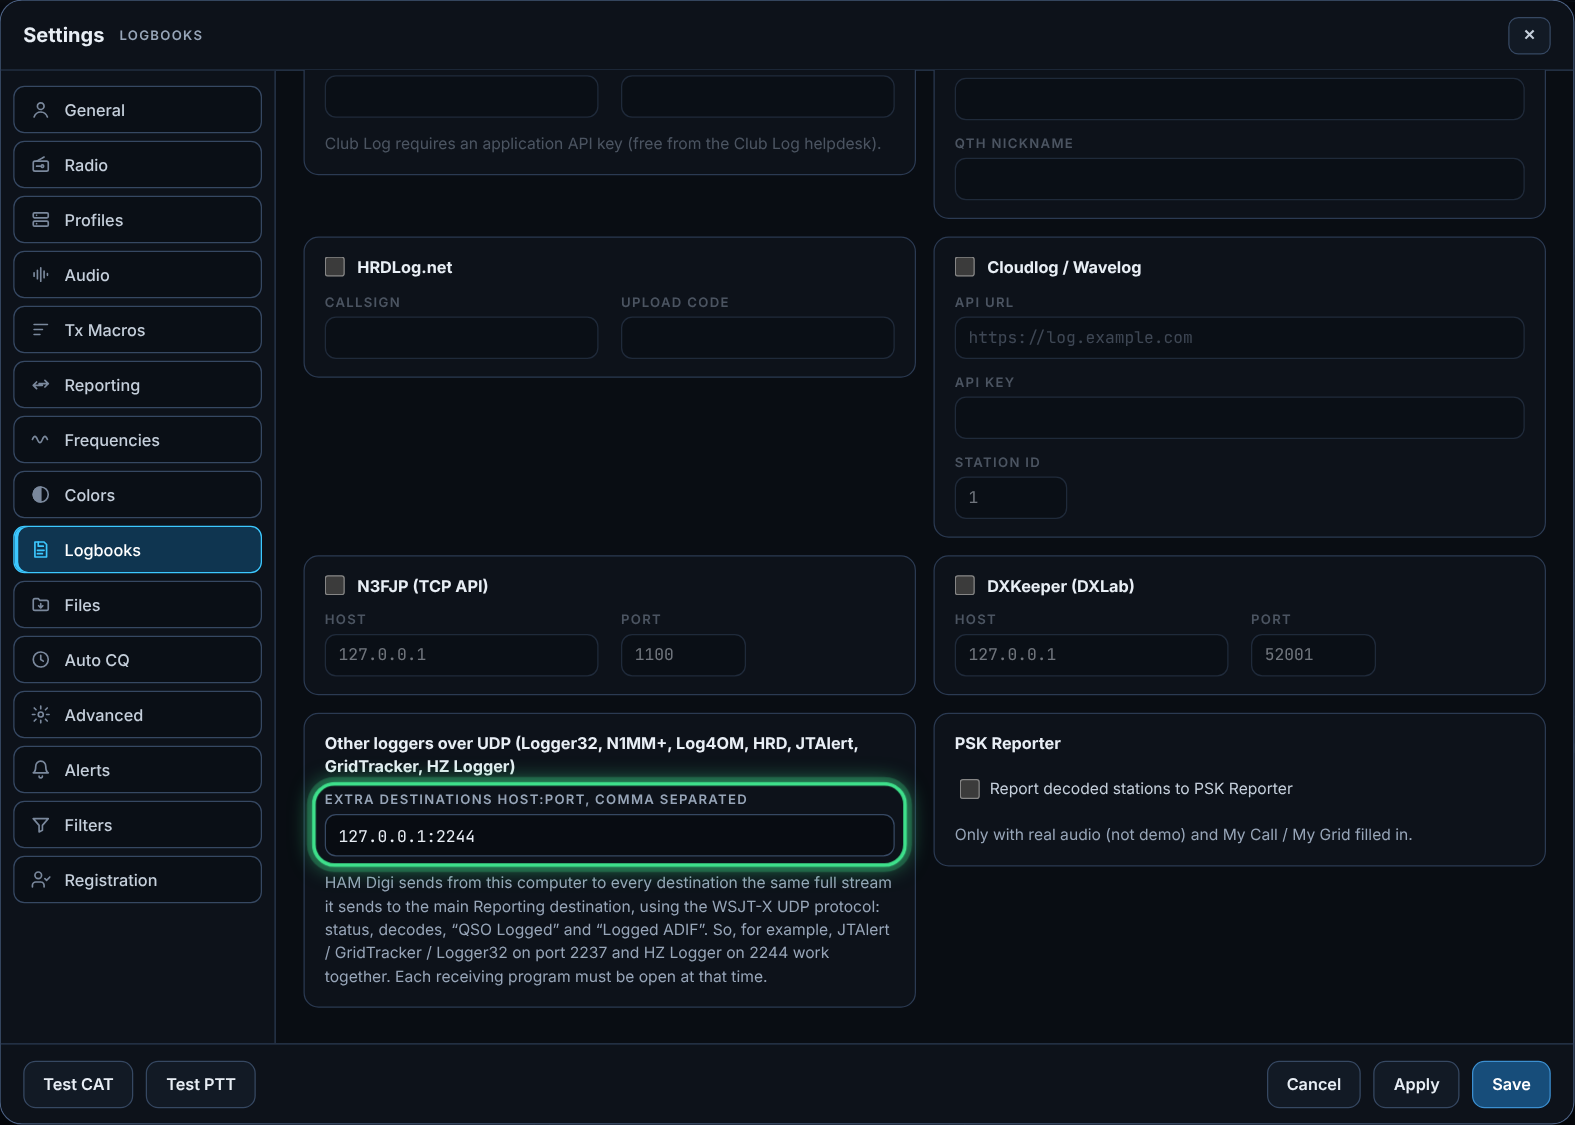
- Other loggers over UDP: e.g.
127.0.0.1:2244for the HELLAS Zone Logger. They get the full WSJT-X stream (status, decodes, QSO Logged, Logged ADIF).
Programs on the computer (Logger32, N1MM+, Log4OM, HRD Logbook, JTAlert, GridTracker, HZ Logger) must be open when the QSO is made. Online logbooks need nothing open.
11. HELLAS Zone Logger, Logger32 and UDP
HAM Digi sends decodes and QSOs over UDP to two ports at the same time. Both settings are needed:
| Where in HAM Digi | What you type | For whom |
|---|---|---|
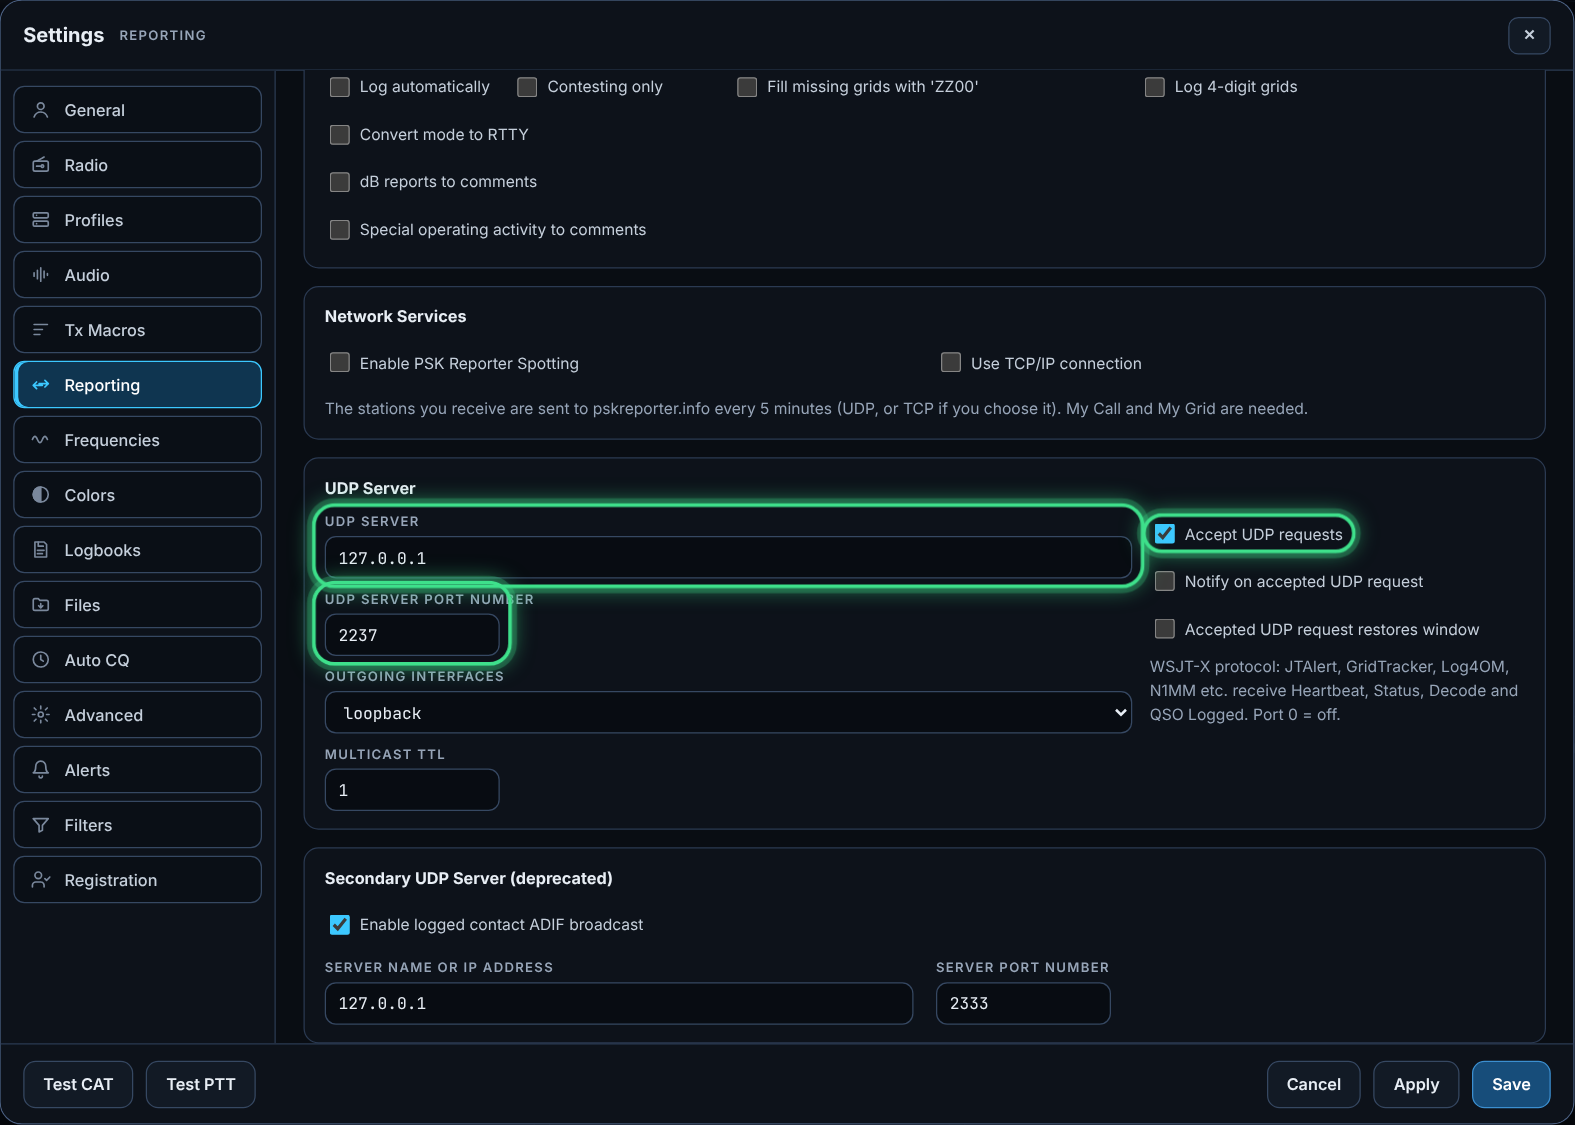
| Settings › Reporting › UDP Server (main port) | 127.0.0.1 · port 2237 | JTAlert, GridTracker, Logger32 and the other well-known programs |
| Settings › Logbooks › Other loggers over UDP | 127.0.0.1:2244 | only the HELLAS Zone Logger |
- In Reporting also tick “Accept UDP requests”.
127.0.0.1:2244is filled in by itself when the field is empty. Do not put it in the main port.- Both ports get the full WSJT-X stream (status, decodes, QSO Logged, Logged ADIF), so the HELLAS Zone Logger and the other programs work at the same time.
- In Logger32 enable its WSJT-X UDP socket on port 2237.
13. Decoding and sensitivity
- FT8, FT4, WSPR, FST4, FST4W, Q65, JT65, JT9 and JT4 are decoded by HAM Digi’s own decoder: several passes that subtract the decoded signals (so weak ones underneath show up), deep decoding (OSD) and AP. The other modes are decoded by the built-in jt9 / wsprd.
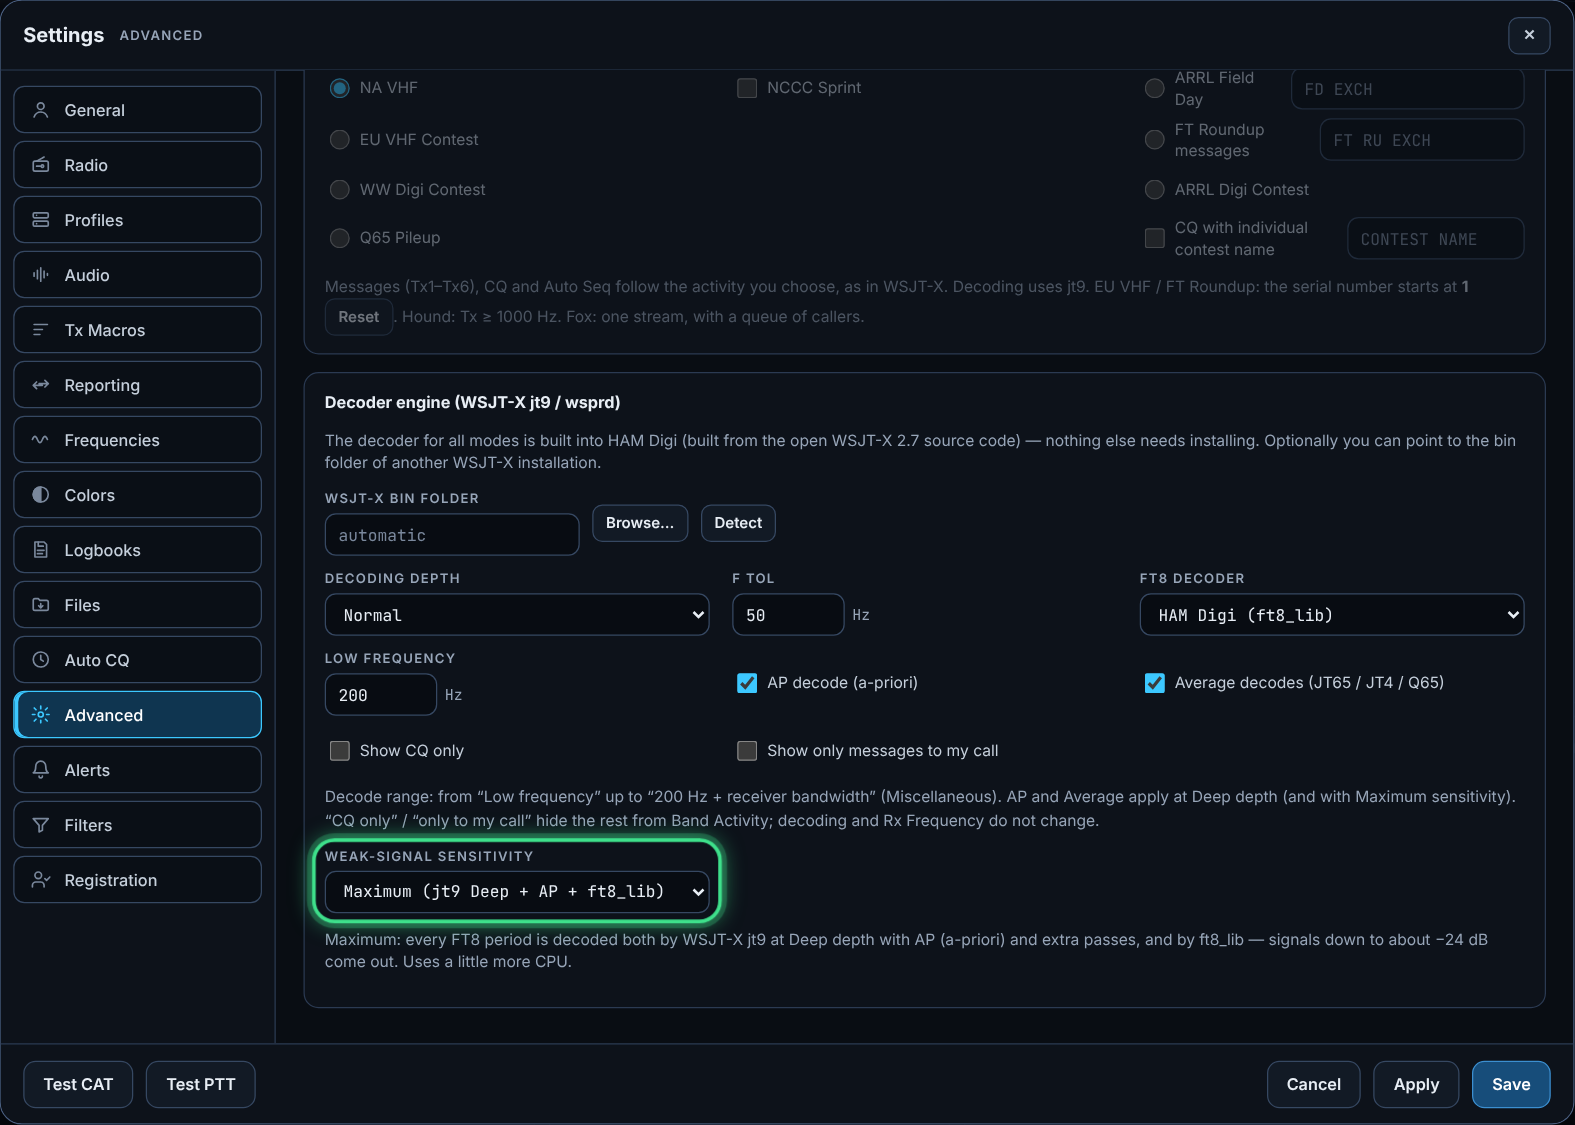
- Settings › Advanced: Weak-signal sensitivity = Maximum (Deep + AP) — FT8 signals down to about −21 dB come out, and with AP even lower for the messages you expect (CQ, replies to your call).
- Low decode frequency, AP decode, averaging (JT65/JT4/Q65), “CQ only”, “only to my call”.
- All WSJT-X 2.7 modes are there. FT2 is coming in a later version.
14. Updates
The program checks by itself at start and every 6 hours. When a new version comes out, it downloads it and “New version” appears at the top right — one click and it reopens. Settings, log and licence stay. By hand: Help › Check for updates. A newer Hamlib: Settings › Radio › Update Hamlib.
15. Problems and solutions
- No decodes appear
- Check the input card, the receive level (30–60 dB), the radio mode (USB-D) and the clock (ΔT < 1 s — Tools › Check PC clock).
- The radio stays in USB instead of USB-D
- Settings › Radio › Mode: Data/Pkt and Save.
- PTT works but no audio goes out / it plays on the speakers
- Choose the radio’s audio output again (e.g. USB Audio CODEC) and Save. On a Mac allow the microphone. On the radio: DATA MOD = USB.
- “The port is in use by another program”
- Close HRD, WSJT-X, flrig or HZ Logger, or connect them through Share CAT (4532).
- QSOs do not reach the logger
- The logger must be open. Check the UDP port (2237 / 2244 / 2333).
- No SWR shown
- SWR is read while transmitting. With HRD it depends on the HRD version; with Hamlib/CI-V it works. Send the CAT log.
- External interface: receives but does not transmit
- PTT = RTS (or DTR) on the interface’s port, Handshake None, on the radio DATA PTT SELECT = DAKY.
Help: write to SA7SVR with a photo and the CAT log (Settings › Radio).
16. Shortcuts
| Key | Action |
|---|---|
| F1 | User guide |
| F2 | Settings |
| F4 | Clear DX Call / Grid |
| Esc | Halt Tx |
| Ctrl+Shift+1…9 | Switch profile |
| Ctrl/⌘ + + / − / 0 | Zoom in / out / 100% |
| Double-click a message or a station on the map | Call the station |
Copyright & terms of use
© 2026 SA7SVR (Panagiotis Tsekouras). All rights reserved.
HAM Digi — its code, design, texts, logos and images — belongs to SA7SVR. Registered and approved radio amateurs may use it for amateur radio.
Without written permission from SA7SVR it is not allowed to copy or republish the code or parts of it, to modify it, to sell or distribute it, or to remove the copyright notices.
Third-party parts. The program also includes, separately and under their own licences: the radio-control library Hamlib (LGPL); the optional jt9/wsprd decoder from WSJT-X (K1JT and the WSJT Development Group, GPLv3), used only if the user chooses it in Settings; and tables from ft8_lib (Kārlis Goba, MIT). The mode decoders and encoders themselves (FT8, FT4, WSPR, FST4, Q65, JT65, JT9, JT4, MSK144, Fox/Hound, CW) are our own code, written from the public protocol descriptions.
These notices are not legal advice.